Digiblaster howto
text copied from: Octoate.de
Contents
CPC-Digiblaster v1.0 and v2.0
The original Text was written by A.Stroiczek and the DMV-Verlag (CPC Schneider International 8/9'91), the hardwarelayout of the Digiblaster v2.0 was performed by Joshua and converted by Octoate.
CPC-Digiblaster - The sound of the printer port
If we're looking at the 16bit computers like Amiga, Atari ST, Mac and PC (with a soundcard) the CPC users can be jealous.
We can help with an easy circuit plan. The CPC only can do rectangle frequencies. Amiga and other computers are working with digital instruments which they give out with internal D/A converters.
If you look exactly the CPC has the possibility to give out digital instruments. For this you need the volume register. This register can handle 16 different volumes. So it may be possible to play samples with 4bit.
But the soundchip dissapoints again. To play a linear volumeincrease the power at the sound port is logarithmical. This means that you have to change the values so that they are linear. So you only have 3bit. The Amiga has a advantage with his 8bit samples. If you say: "Okay, half bits are enough" you are wrong. With 3 bits you can use 8 different values, with 8 bits 256. That means you cannot play low sounds. Okay, if you don't look at the very difficult programming the CPC is not as good as his colleagues. But the meagre printer port allows you to change that.
To play 8bit samples you need a 8bit interface and a circuit which changes the values in a power value. The printer port has 8bit and a 5V power supply (Bit 7 = STROBE).
The printer port makes it possible
To build a D/A unit you normally need a special IC which costs about 15 to 20 DM and it needs an own power supply. The circuit here costs about 3 to 12 DM and does not need an own power supply. But because of this the output power is not exactly linear. You can connect the output of the circuit directly to an amplifier.
All good things are three
Of course, the D/A unit needs a small demo program. Because sampled instruments are very long I only have printed the file 'DATA1.BAS'. Start it and hear a little sound. Strangly it sounds much better when the upper rom is selected.
The programming
The program writes directly to the hardware of the CPC. You can use the port with the address &EFxx. Because the CPC has only a 7bit printer port (we need 8bit for the Digiblaster) we use the STROBE signal, which is inverted by the hardware, so you have to invert your sound value. Now we want to output the value &C5:
LD a,&C5    ;A=&C5
LD B,&EF    ;load the port address
XOR &80     ;invert the 7th bit
OUT (C),A   ;out to the printer port
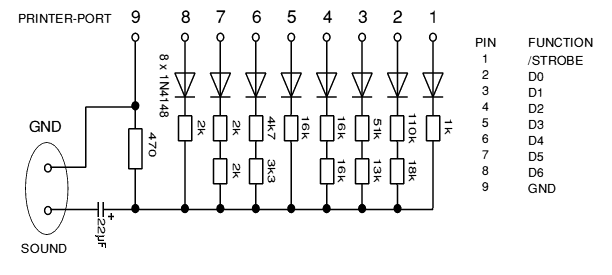
The accu is the register A. The parallel port has the following connects:
  PIN 1              STROBE
  PIN 2              D0
  PIN 3              D1
  PIN 4              D2
  PIN 5              D3
  PIN 6              D4
  PIN 7              D5
  PIN 8              D6
  PIN 9              GND
  PIN 11             BUSY
  PIN 14             GND
  PIN 16 to PIN 28   GND
  PIN 33             GND
The pins that are not named are not connected.
Easy converting
How often you print out the values it is called the sampling rate. This value shall be three times higher than the highest frequency. It is possible to play some instruments at the same time. You have to add the values and divide them. I think that 4 channel sound is possible with the CPC.
Differences between v1 and v2
Both versions are doing more or less the same (and are compatible at software side). Both versions produce linear D/A conversion (though in v1 the conversion is glitchy, v2 is more accurate). Also, in v2, the 470 Ohm POT is replaced by a normal 470 Ohm resistor plus 22uF capacitor.
The different resistor values are:
    STB D6  D5  D4  D3  D2  D1  D0
 v1 1K  2K2 4K7 10K 22K 39K 82K 150K
 v2 1K  2K  4K  8K  16K 32K 64K 128K
Where v1 uses standard E12-series values. Whilst v2 uses less common values like 2K (which you may not have at home), and even totally non-standard values like 4K (which aren't manufactured, and need to be produced by using two 2K resistors).
Notes
- Caution Both schematics connect GND to Pin9, which works on the CPC's (unmodified) 7bit printer port, but not on (upgraded) 8bit Printer Ports, so better connect GND elsewhere (eg. Pin19).
- As said above, Strobe is inverted by the CPC's printer port hardware. And, when using unsigned samples, it must be actually inverted by software. However, with signed samples, that hardware feature is just perfect, and no inversion is needed.
Diagram (Digiblaster v1) (Andreas Stroiczek)
Diagram (Digiblaster v2) (Joshua)
Parts you need:
D1-D8       1N4148
R1          1k
R2          110k
R3          18k
R4          51k
R5          13k
R6,R7,R8    16k
R9          4k7
R10         3k3
R11,R12,R13 2k
R14         470
Converted 1996/1998 by Octoate'

