ARA Video Digitizer
A video digitizer made by Philippe Borg in 1987, for the french company Jagot & Leon. The french name of the hardware is Digizaliseur Ara (seen on sticker), or Ara Digitaliseur d'images video (seen on screenshot).
ARA is said to be simply referring to the colourful parrot with same name (rather than being an abbreviation for something like analog recording apparatus or so).
Contents
Keyboard Controls
The software is very far away from having an intuitive GUI. Some screens are showing some function names like "DIGITIZE", if there are no further instructions given: Try pressing the first letter of that word (ie. "D" for "DIGITIZE"). Some screens are using "rows" of keys on the keyboard (eg. S,D,F,G,H,J,K,L to assign eight settings to one parameter). The digitize screen shows only the plain picture, and completely lacks any simple OSD menues.
Quick Help
To see the images saved on the disc in a slideshow:
- Type RUN"ARA
- Press "V"
- Press SPACE
The enter the digitize mode:
- Type RUN"ARA
- Press "E" to "enter the program"
- Press "D" to "digitize"
Boot Menu
To get here, type RUN"ARA - available options are then:
 L = ? (shows a blank black screen)
 P = ? (shows a blank black screen)
 V = Slideshow Prompt (allows to get to the slideshow)
 E = Main Menu (allows to get to digitize mode)
Slideshow Prompt
To get here, press "V" in Boot Menu - available options are then:
 SPACE = Enter the actual slideshow
 ENTER = Go to main menu
Main Menu
To get here, press "E" in Boot menu (or ENTER at Slideshow Prompt). Available options are then... well, they are strange: The french cuisine related words, entree, hor's d'oeuvres, specialites du chef, and dessert are jokes - ignore them. The actual options are:
 D = Digitize
 P = Paint (allows to edit colour scheme)
 L = Load image from disc
 S = Save image to disc
 C = Catalogue of disc
 I = Insert image from file
 H = Hardcopy (print image)
Digitize Menu
To get here, Type RUN"ARA, then press "E", then press "D". Digitize mode doesn't display any OSD menues or OSD help, so it's hard to use without manual (or without disassembling the code). Available options are:
 COPY      = Apply current image (for later saving to disc)
 ENTER     = Back to Main Menu (the COPY'ied image can be SAVED from there)
 ^         = Autoscan on (displays incoming data "animated" picture stream)
 SPACE     = Autoscan off (useful only if you have a second screen, eg. TV set)
 U         = Undo last capture (when U pressed twice: restore last capture)
 @         = Toggle video mode (320x200x4, or 160x200x16)
 UP/DN     = Vertical picture position (+/- 1 step) (fine adjust)
 LT/RT     = Vertical picture position (+/- 3 steps) (coarse adjust)
 123456789 = Brightness (1=lower, 9=higher)
 SDFGHJKL  = Dithering (S=lower=no dithering, L=higher)
 ERTY      = Contrast (E=lower, Y=higher)
Technical
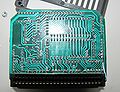
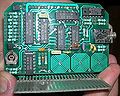
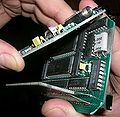
The hardware consists of an A/D converter, and bunch of logic chips. It does also includes two 8K SRAM chips, used as 16K capture buffer (the image is captured to that buffer in realtime, and can then be read by software at slower speed).
The device connects to SCART connector on Video Recorder (or camcorder or other picture source). There seem to be no attempts to decode SECAM color informations, ie. only luminance (brightness) seems to be supported. Luminance should be same in all countries, so it should also work with PAL/NTSC.
Two capture formats are supported: 320x200x4 and 160x200x16. Of which, in practice, the software supports only max 8 colors, not 16 colors (nethertheless, the actual hardware might, or might not support 16 colors, and it's just the software ignoring their LSBs; the CPC's 27-color palette isn't suitable for displaying 16 "grayscales").
The captured data bytes are having the bits arranged differently as CPC's VRAM. For details, see the mode 0 and mode 1 translation tables in the disassembly.
I/O Port Summary
 F8F5h - R - read sync signal (bit0)
 F9F5h - W - reset 10bit config value to zero (write once to set config=0)
 FAF5h - W - increment 10bit config value (write N times to set config=N)
 FAF5h - R - read capture data (after capture was invoked and completed)
 FBF5h - W - invoke capture
The three write-able ports are using a "write-strobe" mechanism (according to the disassembled software, the data written to the ports is don't care).
10bit Config Value
The Z80's 8bit databus doesn't allow to write 10bit values. The ARA is using a rather strange solution to overcome that problem.
The mechanism to set Config=N is:
 OUT [F9F5h],garbage, FOR I=1 to N, OUT [FAF5h],garbage, NEXT I
Whereas, the separate bits in "N" are:
 0-1  Contrast
 2-5  Brightness
 6    Mode (0=320x200x4, 1=160x200x16)
 7-9  Dither
Dotclock
The dotclock (horizontal resolution) is unknown. For a CPC-like aspect ratio, it should be 4MHz (for 320 pixel resolution), which could be obtained from expansion port. However, the digitizer includes it's own crystal (the photo isn't clear there, it looks like 5MHz or 6MHz) (but more probably it's something like 16MHz, the leading "1" being invisible on the photo, 16MHz would be reasonable for splitting a 4MHz dotclock into 4 steps).
Disassembly
- Media:Ara video digitizer disassembled.txt - disassembled ARA.BIN scanning function
Pictures
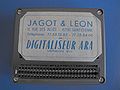
Digitaliseur Ara
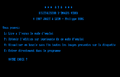
Screenshot (boot menu)

Screenshot (example)
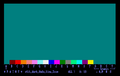
Screenshot (paint function)
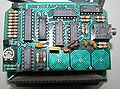
Upper board, top-view
Lower board, bottom-view
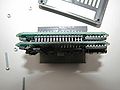
Side view (from top)
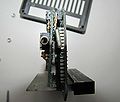
Side view (connector)
Upper board
Spot on lower board


Download
Original driver disc, with ARA.BIN software and including 20 sample images. The images are possibly not the original images shipped with the hardware: they are showing people making love (and they do not omit details). Anyways, they were obviously digitized with the original hardware, and so, they are useful to show the average picture quality of the digitizer hardware, the (slightly uncommon) file format of the images, and to demonstrate the slideshow feature in the ARA software.
Caution: The software includes some french-cuisine-slang expressions which may confuse english users. For example, "ENTREE : DIGITIZE" means "begin with pressing D for digitize". Namely, it does NOT mean "to press ENTER for digitize".
See also
- VIDI digitizer - another video digitizer (Rombo Productions)