Difference between revisions of "Expanding from CPC 464 to CPC 6128 Spec"
Jonathanen (Talk | contribs) (→Step 2) |
Jonathanen (Talk | contribs) (→Note) |
||
| (37 intermediate revisions by 2 users not shown) | |||
| Line 5: | Line 5: | ||
There are two ways to replace the CPC 464 ROM chip.<BR> | There are two ways to replace the CPC 464 ROM chip.<BR> | ||
<BR> | <BR> | ||
| − | + | * A. While everything is switched off and if you have the right set of tools and have any electrical knowledge, remove six screws from the keyboard and carefully take the keyboard a part. Look for the CPC 464 ROM chip with the letters printed "IC103 AMSTRAD 40009" which is already soldered onto the motherboard. Here comes a real challenge.... | |
| − | + | <BR> | |
| − | + | Firstly, you have to remove additional nine screw using a philips screwdriver. And then, you have to de-soldier all the legs from the CPC 464 ROM chip, remove it and replace with [http://www.maplin.co.uk/p/dual-in-line-socket-28-pin-bl21x DIL Socket 28-Pin] (Maplin ref no: BL21X, which it costs about 14p each - current price is now 29p each or can be purchased from [https://www.ebay.co.uk/sch/i.html?_from=R40&_sacat=0&_nkw=DIL+Socket+28-Pin&_sop=15 eBay]), making it easier to swap 464 or 6128 ROMs and visa versa, then solder all the legs from that socket onto the motherbaord.<BR> | |
| − | + | <BR> | |
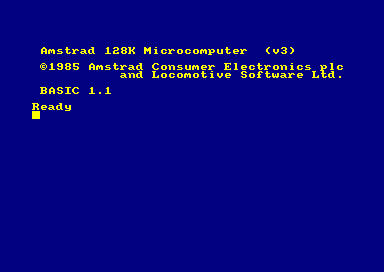
| − | + | Next, put the CPC 6128 ROM chip printed "AMSTRAD 40025 8902 B" inside the DIL 28-way socket. Put all the bits into place, put the keyboard cover back on and then put six screws back on. Now to test your handy work... After your computer powered up with all accessories, your screen should show exactly the same as [[Media:Cpc6128.gif|CPC 6128 start-up]] screen.<BR> | |
| − | + | ||
| − | + | ||
| − | + | ||
| − | + | ||
<BR> | <BR> | ||
| − | + | '''NOTE:''' All versions of [http://www.old-computers.com/museum/computer.asp?st=1&c=84 CPC 464] keyboards including Arnold 1 (according to [http://genesis8.free.fr/amstrad/faq/amstrad.php#A comp.sys.amstrad.8bit FAQ]) version with big "AMSTRAD" letters printed onto the keyboard, like the one shown on the [http://www.old-computers.com/museum/photos/s_amstrad_464_inside1.jpg photo] - #'''12''': 32 Kb ROM memory containing the operating system and Locomotive Basic. Also with the "[http://cpctech.cpc-live.com/docs/costdown.html Cost-Down]" version as well doesn't have a socket to remove and replace Operating System ROM chips, instead all the legs are soldiered on and its impossible to remote it straight away, unless you know how to de-soldier - 31/6/05.<BR> | |
| − | + | <BR> | |
| − | + | * B. Simply exchange your CPC 464 keyboard to Amstrad Specialist ([https://web.archive.org/web/20100201160217/http://www.midnight.uk.com:80/merline/ Arthur Cook]) for another CPC 464 keyboard with CPC 6128 ROM chip fitted (That's what I did with [[User:Jonathanen#17th_June_2000.2A_-_expanded_to_CPC_6128_spec._.2821.29|mine]] on Thursday 12th Oct 2000, while I was rushing to get home from Worthing and that time, I didn't know how to replace Operating System ROMs) or ask him to do it for you and paid for it, of course. <BR> | |
| − | + | ||
| − | + | ||
<BR> | <BR> | ||
| + | |||
= Step 2 = | = Step 2 = | ||
| − | Now you have a choice to do the following | + | Now you have a choice to do one of the following options:<BR> |
<BR> | <BR> | ||
| − | * A. Replace the AMSDOS / CP/M bootstrap ROM with | + | * A. Replace the [[AMSDOS]] / CP/M bootstrap ROM with [[ParaDOS]] ROM inside the disc interface (it allows you to use the full capacity on 3.5" disc drive). |
<BR> | <BR> | ||
| − | '''RECOMMENDED''' to do so, if you're | + | '''RECOMMENDED''' to do so, if you're using either:<BR> |
| − | * Upgraded CPC 464+ to 6128+ spec <BR> | + | |
| − | * Unexpanded CPC 464 without CPC 6128 OS/BASIC ROM installed | + | * [[464Plus_Conversion#Jonathanen.27s_Easy_Way_To_464.2B_Conversion|Upgraded CPC 464+ to 6128+ spec]] <BR> |
| + | * Unexpanded CPC 464 without CPC 6128 OS/BASIC ROM installed, having only both DDI-1 3" & 3.5" external disc drives connected. | ||
<BR> | <BR> | ||
| − | To do that, you must remove | + | To do that, you must remove two screws first, open the cover, carefully remove the [[AMSDOS]] ROM chip with "AMSTRAD 40009" printed on top of it and replace it with [[ParaDOS]] ROM. Then put the cover back on and put the two screws back on.<BR> |
<BR> | <BR> | ||
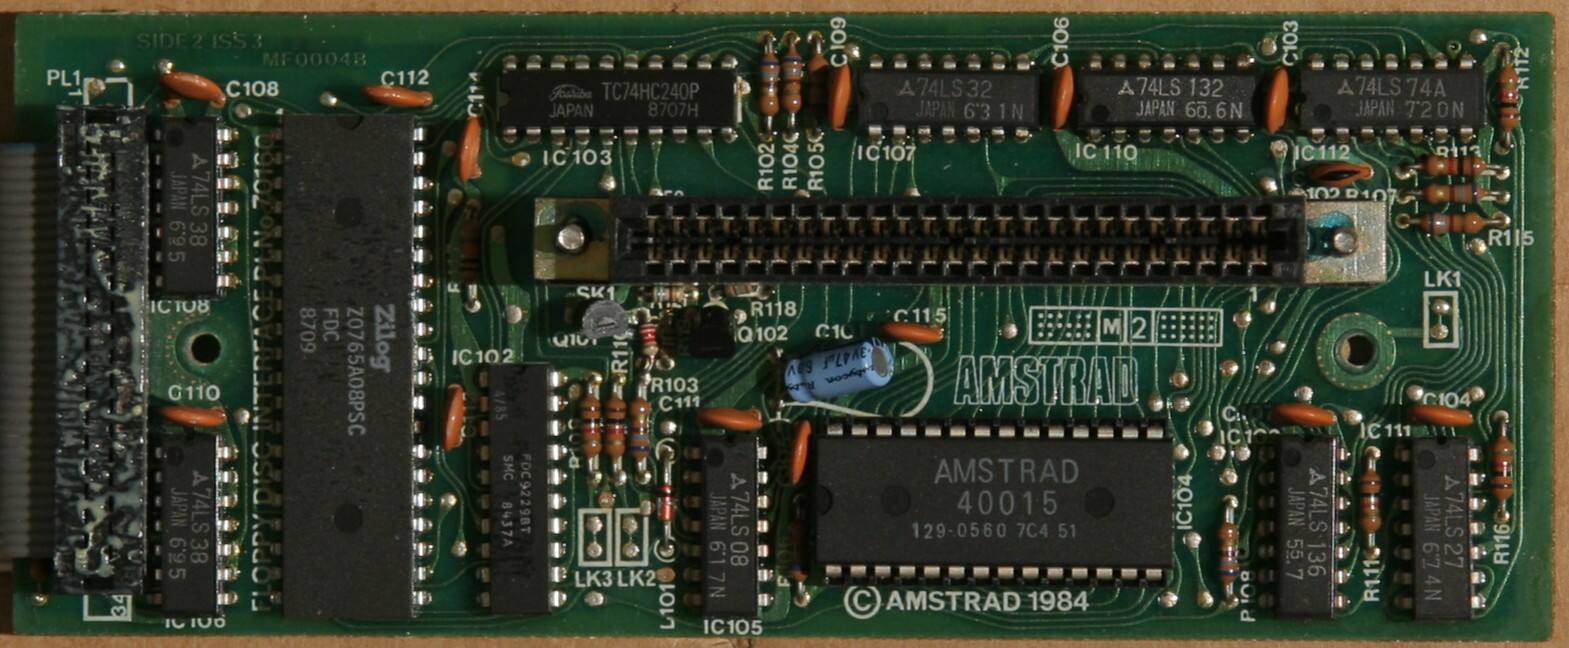
| − | * B. Leave the [[AMSDOS]] / CPM bootstrap ROM inside the [[Media:Gerald_DDI-1_MF0004B.jpg|disc interface]] (if you want to use DR. LOGO 2 & 3 on upgraded CPC 464) and put ParaDOS ROM inside the Rombo ROMBOX with other ROMS (as shown | + | * B. Leave the [[AMSDOS]] / CPM bootstrap ROM inside the [[Media:Gerald_DDI-1_MF0004B.jpg|disc interface]] (if you want to use DR. LOGO 2 & 3 on upgraded CPC 464) and put [[ParaDOS]] ROM inside the [[Rombo_Rombox|Rombo ROMBOX]] with other ROMS (as shown in [[Expanding_from_CPC_464_to_CPC_6128_Spec#Step_3|step 3]]). |
<BR> | <BR> | ||
| Line 41: | Line 37: | ||
<BR> | <BR> | ||
* [[Dk'tronics_memory_expansion|DK'tronics 64K RAM pack Memory Expansion]] (removable RAM chips) >> upgraded to [[Media:Upgraded64kRAM.JPG|256K]] - [[Upgrading_a_Dk%27tronics_RAM_Expansion|instructions]] | * [[Dk'tronics_memory_expansion|DK'tronics 64K RAM pack Memory Expansion]] (removable RAM chips) >> upgraded to [[Media:Upgraded64kRAM.JPG|256K]] - [[Upgrading_a_Dk%27tronics_RAM_Expansion|instructions]] | ||
| − | * [[Rombo_Rombox|Rombo ROMBOX]] with following ROMS from RAM pack pass-through connector | + | * [[Rombo_Rombox|Rombo ROMBOX]] with following ROMS from RAM pack pass-through connector - '''OPTIONAL!!''' But it makes computing much easier, leaving out both slots 0 ([[BASIC]]) & 7 ([[AMSDOS]]) remaining unused: <BR> |
| − | :* Slot 1: [[ | + | :* Slot 1: [[BCPL]] - Compiler from PJB & [[Arnor|Arnor Ltd.]] |
| − | :* Slot 2: [[ | + | :* Slot 2: [[Maxam]] - Assembler from [[Arnor|Arnor Ltd.]] |
| − | :* Slot | + | :* Slot 4: [[ParaDOS]] - '''***''' '''ONLY!!''' If you choose to leave [[AMSDOS]] ROM chip inside the [[Media:Gerald_DDI-1_MF0004B.jpg|disc interface]] as mentioned in step 2B '''***''' |
| − | + | :* Slot 5: [[Protext]] - Word processor from [[Arnor|Arnor Ltd.]] | |
| − | :* Slot | + | :* Slot 6: [[Utopia]] - General purpose utilities |
| − | + | * [[Amstrad_Disk_Drive|Amstrad DDI-1 External 3" Disc Drive]] with Disc interface (a choice of either replaced with [[ParaDOS]] ROM - '''recommended''' to do it for [[464Plus_Conversion#Jonathanen.27s_Easy_Way_To_464.2B_Conversion|upgraded CPC 464+ to 6128+ spec]] or leave the [[AMSDOS]] ROM inside the disc interface - for using DR. LOGO on upgraded CPC 464 to 6128 spec, '''NOT''' [[464Plus_Conversion#Jonathanen.27s_Easy_Way_To_464.2B_Conversion|upgraded 464+]]) from the pass-through connector on the [[Rombo_Rombox|ROMBOX]] | |
| − | :* Slot | + | * 3.5” External disc drive with external power supply, [[Side Select Switch|side switch]], [[Adding_3.5"_drive_to_CPC464#3.5.22_READY_Signal_Test|"READY" signal]], DI-2 Inter-connecting Lead & [http://www.ebay.co.uk/itm/5Pcs-2-54mm-2x17-Pin-34-Pin-IDC-Male-Box-Header-Cable-Connector-Mounting-Ear-/172302047820?hash=item281e009a4c:g:KJkAAOSwl5dZdv-I 34 way IDC Male connector] (34 pins sticking out) onto drive B connector on disc interface (back of DDI-1) and place this disc drive on top of DDI-1 external disc drive - if you not sure how to, then follow "[http://www.cpcwiki.eu/index.php/Adding_3.5%22_drive_to_CPC464 Adding 3.5" Disc Drive 'B' - For CPC 464 Series with DDI-1 only!!]" instructions.<BR> |
| − | * [[Amstrad_Disk_Drive|Amstrad DDI-1 External 3" Disc Drive]] with Disc interface (a choice of either replaced with ParaDOS ROM - recommended to do it for upgraded CPC 464+ to 6128+ spec or leave the AMSDOS ROM inside the disc interface - for using DR. LOGO on upgraded CPC 464 to 6128 spec, '''NOT''' [[464Plus_Conversion#Jonathanen.27s_Easy_Way_To_464.2B_Conversion|upgraded 464+]]) from the pass-through connector on the ROMBOX | + | <BR> |
| − | * 3.5” External disc drive with external power supply, [[Side Select Switch|side switch]], READY signal | + | |
= Step 4 = | = Step 4 = | ||
| − | Follow the "READY | + | Follow the [[Adding_3.5"_drive_to_CPC464#3.5.22_READY_Signal_Test|"READY" signal]] instructions (if necessary) for 3.5" disc drive Ready signal test.<BR> |
<BR> | <BR> | ||
After all that, your fully expanded Amstrad CPC 464 to CPC 6128 spec set-up should look similar like this as shown below: <BR> | After all that, your fully expanded Amstrad CPC 464 to CPC 6128 spec set-up should look similar like this as shown below: <BR> | ||
| Line 61: | Line 56: | ||
Now you have a choice to play games or save / load programs from tape, either 3” or 3.5” discs! As software is concerned, its the same as CPC 6128 with a few add-ons included. <BR> | Now you have a choice to play games or save / load programs from tape, either 3” or 3.5” discs! As software is concerned, its the same as CPC 6128 with a few add-ons included. <BR> | ||
<BR> | <BR> | ||
| + | |||
= Note = | = Note = | ||
<BR> | <BR> | ||
This idea originally comes from [http://www.obsoletecomputermuseum.org/amstrad/ David Cantrell's CPC 464] at [http://www.obsoletecomputermuseum.org Obsolete Computer Museum] but he didn't write out the instructions how to do it like I did. Its took me months of research to work out how it works on my own CPC 464 one by one and writing it out on rough paper, after I have looked at his web site for the first time and thinking that "Wow! That's what I always wanted on my CPC 464" while I was searching for Amstrad CPC 464 Specs on Internet. Now its here on this web site and I'm very proud that it works perfectly on my expanded CPC 464.<BR> | This idea originally comes from [http://www.obsoletecomputermuseum.org/amstrad/ David Cantrell's CPC 464] at [http://www.obsoletecomputermuseum.org Obsolete Computer Museum] but he didn't write out the instructions how to do it like I did. Its took me months of research to work out how it works on my own CPC 464 one by one and writing it out on rough paper, after I have looked at his web site for the first time and thinking that "Wow! That's what I always wanted on my CPC 464" while I was searching for Amstrad CPC 464 Specs on Internet. Now its here on this web site and I'm very proud that it works perfectly on my expanded CPC 464.<BR> | ||
<BR> | <BR> | ||
| − | [[Image:CPC46426128_dualROM.JPG|thumb|600px|centre|Another upgraded Amstrad CPC 464 except with dual Amstrad CPC 464 & CPC 6128 OS/BASIC ROM Chips fitted inside older CPC 464 keyboard, a 464 / 6128 Mode switch on left hand side and 2 x 3" FD-1 drives (DDI-1) - purchased from eBay on 4th March 2012. Both PARADOS ROM replaced inside disc interface & Dk'tronics 64K RAM pack (SMD version) wasn't included in the part of the package and it was purchased separately.]]< | + | [[Image:CPC46426128_dualROM.JPG|thumb|600px|centre|Another upgraded Amstrad CPC 464 except with dual Amstrad CPC 464 & CPC 6128 OS/BASIC ROM Chips fitted inside older CPC 464 keyboard, a 464 / 6128 Mode switch on left hand side and 2 x 3" FD-1 drives (DDI-1) - purchased from eBay on 4th March 2012. Both PARADOS ROM replaced inside disc interface & Dk'tronics 64K RAM pack (SMD version) wasn't included in the part of the package and it was purchased separately.]] |
| + | |||
| + | = Pictures = | ||
| + | |||
| + | <gallery caption="Archives"> | ||
| + | |||
| + | Image:AmstradAction004--074.jpg|AA Issue 4 - Page 74 | ||
| + | Image:AmstradAction004--075.jpg|AA Issue 4 - Page 75 | ||
| + | Image:AmstradAction030-26.jpg|AA Issue 30 - Page 26 | ||
| + | Image:AmstradAction046-16.jpg|AA Issue 46 - Page 16 | ||
| + | Image:AmstradAction046-17.jpg|AA Issue 46 - Page 17 | ||
| + | |||
| + | </gallery> | ||
| + | |||
= Links = | = Links = | ||
| − | [ | + | * [https://www.retrocomputers.online/2012/06/amstrad-cpc464-upgraded-to-a-cpc6128-how-to/ How to convert a Amstrad CPC464 into a CPC6128 | Retro Computers]<BR> |
| − | [http://www.eightbitmagazine.com/cpcoxygen/magazine/01/super464/super464.htm Super 464 | CPC Oxygen]<BR> | + | * [https://www.retrocomputers.online/2012/06/how-to-install-parados-into-the-amstrad-dd-1-disk-interface/ How to install PARADOS into the Amstrad DDI-1 disk interface | Retro Computers]<BR> |
| − | [http://www.freetimeweb.nl/home/computer/cpc/cpc_464_extended_uk.html THE AMSTRAD / SCHNEIDER CPC EXTENDED]<BR> | + | * [http://www.eightbitmagazine.com/cpcoxygen/magazine/01/super464/super464.htm Super 464 | CPC Oxygen]<BR> |
| − | [http://www.indieretronews.com/2014/06/amstrad-ddi-1-clone-latest-interface.html Amstrad DDI-1 clone - The latest interface device for the Amstrad CPC 464 on Steve Netting's Amstrad 464]<BR> | + | * [http://www.freetimeweb.nl/home/computer/cpc/cpc_464_extended_uk.html THE AMSTRAD / SCHNEIDER CPC EXTENDED]<BR> |
| − | [http://www.theregister.co.uk/Print/2014/02/12/archaeologic_amstrad_cpc_464/ You’re NOT fired: The story of Amstrad’s amazing CPC 464 • The Register]<BR> | + | * [http://www.indieretronews.com/2014/06/amstrad-ddi-1-clone-latest-interface.html Amstrad DDI-1 clone - The latest interface device for the Amstrad CPC 464 on Steve Netting's Amstrad 464]<BR> |
| − | [http://www.retrogamer.net/profiles/hardware/amstrad-cpc-6128/ Amstrad CPC 6128 | Retro Gamer]<BR> | + | * [http://www.theregister.co.uk/Print/2014/02/12/archaeologic_amstrad_cpc_464/ You’re NOT fired: The story of Amstrad’s amazing CPC 464 • The Register]<BR> |
| + | * [http://www.retrogamer.net/profiles/hardware/amstrad-cpc-6128/ Amstrad CPC 6128 | Retro Gamer]<BR> | ||
| + | * [[Amstrad Action]] ([[Amstrad_Action,_Issue_30,_Mar_1988|Issue 30, March 1988]]) - [[:File:AmstradAction030-26.jpg|page 26]] | ||
| + | |||
| + | |||
| + | [[Category:Hardware]] | ||
Latest revision as of 10:13, 15 October 2020
Step-by-step instructions
Step 1
There are two ways to replace the CPC 464 ROM chip.
- A. While everything is switched off and if you have the right set of tools and have any electrical knowledge, remove six screws from the keyboard and carefully take the keyboard a part. Look for the CPC 464 ROM chip with the letters printed "IC103 AMSTRAD 40009" which is already soldered onto the motherboard. Here comes a real challenge....
Firstly, you have to remove additional nine screw using a philips screwdriver. And then, you have to de-soldier all the legs from the CPC 464 ROM chip, remove it and replace with DIL Socket 28-Pin (Maplin ref no: BL21X, which it costs about 14p each - current price is now 29p each or can be purchased from eBay), making it easier to swap 464 or 6128 ROMs and visa versa, then solder all the legs from that socket onto the motherbaord.
Next, put the CPC 6128 ROM chip printed "AMSTRAD 40025 8902 B" inside the DIL 28-way socket. Put all the bits into place, put the keyboard cover back on and then put six screws back on. Now to test your handy work... After your computer powered up with all accessories, your screen should show exactly the same as CPC 6128 start-up screen.
NOTE: All versions of CPC 464 keyboards including Arnold 1 (according to comp.sys.amstrad.8bit FAQ) version with big "AMSTRAD" letters printed onto the keyboard, like the one shown on the photo - #12: 32 Kb ROM memory containing the operating system and Locomotive Basic. Also with the "Cost-Down" version as well doesn't have a socket to remove and replace Operating System ROM chips, instead all the legs are soldiered on and its impossible to remote it straight away, unless you know how to de-soldier - 31/6/05.
- B. Simply exchange your CPC 464 keyboard to Amstrad Specialist (Arthur Cook) for another CPC 464 keyboard with CPC 6128 ROM chip fitted (That's what I did with mine on Thursday 12th Oct 2000, while I was rushing to get home from Worthing and that time, I didn't know how to replace Operating System ROMs) or ask him to do it for you and paid for it, of course.
Step 2
Now you have a choice to do one of the following options:
- A. Replace the AMSDOS / CP/M bootstrap ROM with ParaDOS ROM inside the disc interface (it allows you to use the full capacity on 3.5" disc drive).
RECOMMENDED to do so, if you're using either:
- Upgraded CPC 464+ to 6128+ spec
- Unexpanded CPC 464 without CPC 6128 OS/BASIC ROM installed, having only both DDI-1 3" & 3.5" external disc drives connected.
To do that, you must remove two screws first, open the cover, carefully remove the AMSDOS ROM chip with "AMSTRAD 40009" printed on top of it and replace it with ParaDOS ROM. Then put the cover back on and put the two screws back on.
- B. Leave the AMSDOS / CPM bootstrap ROM inside the disc interface (if you want to use DR. LOGO 2 & 3 on upgraded CPC 464) and put ParaDOS ROM inside the Rombo ROMBOX with other ROMS (as shown in step 3).
Step 3
Connect all the peripherals to "Expansion" port connector (located at the back of the keyboard) in the following order:
- DK'tronics 64K RAM pack Memory Expansion (removable RAM chips) >> upgraded to 256K - instructions
- Rombo ROMBOX with following ROMS from RAM pack pass-through connector - OPTIONAL!! But it makes computing much easier, leaving out both slots 0 (BASIC) & 7 (AMSDOS) remaining unused:
- Slot 1: BCPL - Compiler from PJB & Arnor Ltd.
- Slot 2: Maxam - Assembler from Arnor Ltd.
- Slot 4: ParaDOS - *** ONLY!! If you choose to leave AMSDOS ROM chip inside the disc interface as mentioned in step 2B ***
- Slot 5: Protext - Word processor from Arnor Ltd.
- Slot 6: Utopia - General purpose utilities
- Amstrad DDI-1 External 3" Disc Drive with Disc interface (a choice of either replaced with ParaDOS ROM - recommended to do it for upgraded CPC 464+ to 6128+ spec or leave the AMSDOS ROM inside the disc interface - for using DR. LOGO on upgraded CPC 464 to 6128 spec, NOT upgraded 464+) from the pass-through connector on the ROMBOX
- 3.5” External disc drive with external power supply, side switch, "READY" signal, DI-2 Inter-connecting Lead & 34 way IDC Male connector (34 pins sticking out) onto drive B connector on disc interface (back of DDI-1) and place this disc drive on top of DDI-1 external disc drive - if you not sure how to, then follow "Adding 3.5" Disc Drive 'B' - For CPC 464 Series with DDI-1 only!!" instructions.
Step 4
Follow the "READY" signal instructions (if necessary) for 3.5" disc drive Ready signal test.
After all that, your fully expanded Amstrad CPC 464 to CPC 6128 spec set-up should look similar like this as shown below:

Now you have a choice to play games or save / load programs from tape, either 3” or 3.5” discs! As software is concerned, its the same as CPC 6128 with a few add-ons included.
Note
This idea originally comes from David Cantrell's CPC 464 at Obsolete Computer Museum but he didn't write out the instructions how to do it like I did. Its took me months of research to work out how it works on my own CPC 464 one by one and writing it out on rough paper, after I have looked at his web site for the first time and thinking that "Wow! That's what I always wanted on my CPC 464" while I was searching for Amstrad CPC 464 Specs on Internet. Now its here on this web site and I'm very proud that it works perfectly on my expanded CPC 464.

Pictures
- Archives

AA Issue 4 - Page 74

AA Issue 4 - Page 75

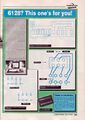
AA Issue 30 - Page 26

AA Issue 46 - Page 16
AA Issue 46 - Page 17


Links
- How to convert a Amstrad CPC464 into a CPC6128 | Retro Computers
- How to install PARADOS into the Amstrad DDI-1 disk interface | Retro Computers
- Super 464 | CPC Oxygen
- THE AMSTRAD / SCHNEIDER CPC EXTENDED
- Amstrad DDI-1 clone - The latest interface device for the Amstrad CPC 464 on Steve Netting's Amstrad 464
- You’re NOT fired: The story of Amstrad’s amazing CPC 464 • The Register
- Amstrad CPC 6128 | Retro Gamer
- Amstrad Action (Issue 30, March 1988) - page 26